
Wordpress Introduction
Today you will be learning the basics of how to create a website using Wordpress, one of the most popular platforms for building websites.
Personal Website Warm-Up
In your group, divide up the following personal websites of people who are related to the class (author of a reading, speaking to our class, or involved with the Digital Studies Certificate) so that each person in your group is examining one website. Go through the website and think about what kind of information it includes, how it is organized, and what message it is sending about the person.
Once you’ve had a chance to explore your individual website, compare notes across the different websites (pull each of them up on your own machine):
- What are the similarities and differences in terms of content?
- What are similarities and differences in terms of design and layout?
The Wordpress Dashboard
- The Wordpress dashboard is the main “behind-the-scenes” interface through which you will build your website
- Change the Title and tagline of your site under
Settings -> GeneralSettings to something more appropriate than the default title that comes with the Wordpress installation (ex. Title: “Cameron Blevins” and Tagline: “History Professor”) - Under
Settings -> Reading, check the box next toSearch engine visibilityso that search engines like Google don’t lead anyone to your site while you’re still setting it up. - Click the Home icon in the upper left corner of the screen. This will move you from the Dashboard to the actual website itself (what it looks like to a user going to your site). You’ll see a bunch of “placeholder” text that comes pre-loaded with your Wordpress installation. Our goal for today is to clean this up and get you started with your own content.
- To get back to the Dashboard, click on the title of your site (or the dial icon) towards the upper left-hand corner
- For more information: Navigating in Wordpress Dashboard
Working With Pages
Wordpress sites are made up of posts and pages. For the purposes of this class, we’re going to be using primarily pages rather than posts (which are used mainly for blogs rather than for portfolio sites).
Make an About page
- Most personal websites have an About page that gives some information about the person. You’re going to create an About page for your personal webpage.
- In the Wordpress Dashboard, click on
Pageson the left side of the screen. - You should see two existing pages already - these are pages that Wordpress automatically generated for your site when you installed it.
- Click
Add Neweither on the left sidebar or at the top of Pages - This brings up a page Editor interface. This is the main interface you’ll use to write and modify individual pages on your site - think of these as individual Word documents.
- Give your page a new title:
About - Click the plus sign
+to add a new “block” - this is a discrete piece of your page such as a paragraph, image, etc. Click on Paragraph. - Inside the blank block, write 1-2 sentences about yourself (your name, major, university, educational interets, etc.) - don’t worry about sepcifics, you’ll be refining this later!
- Make some of the words in your block bold and italic.
- Use the “Preview” option at the top to see how your page looks on your site
- Add an image to your About page:
- Go back to the Editor and add a new image block with the plus sign (
+) -> Image - Insert an image from your computer. Choose any image, or just use the one you downloaded from Prof. Blevins last class (this is just a temporary placeholder to practice inserting images)
- Click on the block and adjust the size of the image. you can do this directly in the block or specify the width and height of the image on the right side of the screen.
- When you’re done, click the Publish button and then click View Page to see the new page.
- Go back to the Editor and add a new image block with the plus sign (
The Landing Page
- The landing page is the main page a user will see when they go to your domain name.
- In this case, we’re going to use the newly created
Aboutpage as your landing page. - Make sure you’re in the Wordpress Dashboard
- To make this About page appear as the landing page for your site, go to:
Settings -> Reading, go toYour homepage displaysand checkA static page. Then select the newly created About page from the dropdown underHomepage. - If you click on the upper-left home icon, you can see your site and it should display your newly created About page
Add a new page for an assignment
- Your first major assignment for this course is the Digital Hygiene assignment, which requires you to create a page on your Wordpress site and submit that URL to Canvas.
- Follow the steps you did above to make an About page, except:
- Title the page “Digital Hygiene”
- Add a block of Paragraph text with a placeholder sentence - ex. “This is going to be where I write my assignment.”
- Publish the page.
Layout and Design of your Site
Themes and the Full Site Editor
- The look and feel of your site (ex. colors, font, sidebars, layout, etc.) is mainly determined by a
Theme. Web designers have built thousands of different Themes you can choose from and switch between at any time. Switching themes doesn’t change any of the content of your site (ex. written pages, images you’ve uploaded, etc.) it just changes how it looks. - For today, we’re going to keep the default
Themethat comes preloaded with your Wordpress installation: Twenty Twenty-Three - Within an overall theme, however, you can tweak some of its design using the
Full Site Editor. - To start modifying it, go to your Dashboard and click on
Appearance->Editor. - More information about the Full Site Editor
Site Styles
- Styles change the overall color palette and typography of your site.
- Go to the
Stylesicon in the upper right: it looks like a circle with one white and one black half. - Click
Browse Stylesand click on some of the colored thumbnails to try out some different styles for your site. Note how each of them change things like the background color, the font, or even the capitalization of your site title, but the overall layout of the site stays the same. - Choose one that works for you -
Defaultis a safe choice, but you can choose another one and always change it later. For professional reasons, I would stay away from the super bright/”loud” ones
- If you’ve chosen something besides Default, click the Save button at the top of the screen
- More information on Styles
Changing the header
- The
Full Site Editoralso allows you to adjust the overall layout of your site, what different elements of your site look like, and how users navigate it. - To get to the Full Site Editor you can go to Dashboard -> Appearance -> Editor.
- I’ve found the easiest way to navigate the Full Site Editor is through its
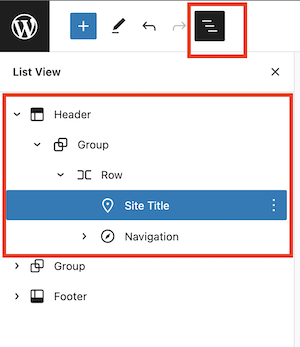
List View(more info) - three horizontal lines towards the upper left of the screen. This allows you to see the “layers” of different parts of your site. - We’re going to zero in on the site’s
Header, or the top bar of the site. Included in here is the Title of your website and what’s called a Navigation Menu, or a way for a user to access and find different parts of your site. - Click on
List View(three horizontal bars) then in the left pane that appears click the side arrow next toHeaderand drill down the list under Header until you see Page ListSite TitleandNavigationappear:
Changing the title size
- Adjust the size of your main site title:
- Click on
Site Titlein List View - If you don’t see a right-hand pane open, click the gear icon for
Settings - On the right-hand pane that opens, scroll down to
Typographyand then choose a larger font size (S, M, L, XL, XXL). Note: depending on the global style you selected, this might not change the appearance much
- Click on
Changing the Navigation Menu
- The Navigation part of the header is where users can move around your website and has links to different pages and parts of the site.
- Your Navigation menu in the upper right should have
Sample Pagethat came pre-loaded with the site, theAboutpage you created above appear, and the newly createdDigital Hygienepage. - The default layout for this theme is for any new page you create to be added to the
Navigation Menuso that a user can locate it. We’re going to change that so you have some more flexbility in designing the Navigation Menu - Use the
List Viewto drill down and click the arrow next toNavigation. You should seePage ListunderNavigation. - Click on
Page List. In the actual Header area where the pages are listed, you should see a set of buttons - click theEditbutton and in the pop-up window click the button toConvert to links.
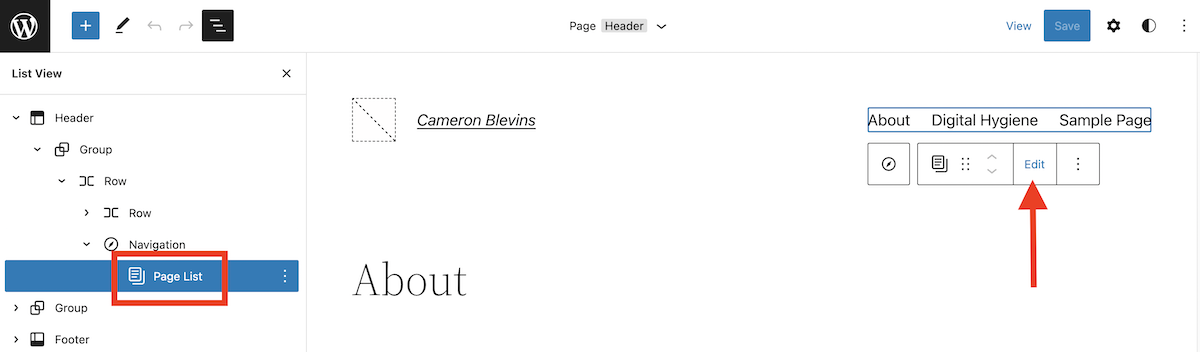
- This now allows you to select individual pages you want included in your Navigation Menu, rather than automatically adding any new page to the Navigation Menu.
- You certainly don’t need the
Sample Pagethat comes pre-loaded with the Wordpress installation, so let’s remove it from the menu:- Click the three dots next to
Sample Pageon theList Viewleft-hand pane and click Remove at the bottom to remove this page from the Navigation Menu
- Click the three dots next to
- (More information on working with headers)
Using sub-menus to group your pages
- Sub-menus are a way to collect pages together under an overarching category so the Navigation Menu isn’t cluttered with too many pages
- We’re going to create a new drop-down list called “Digital Studies Assignments”
- In the upper right Navigation Menu, click the black plus sign (+) to Add Block
- In the “Search or type url” bar, type “Digital Studies Assignments” and hit enter
- Click inside the new menu item you’ve created, click on the icon that’s second-from the left (next to the compass icon), and then click
Submenu:

- This changes
Digtial Studies Assignmentsmenu item into a kind of container. If you add individual pages to this container, you will be able to access them as a drop-down menu by clicking on “Digital Studies Assignments. - To add a page under this new sub-menu, go to the
List Viewon the left. Click, hold, and drag theDigital Hygienepage on top of theDigital Studies Assignmentssubmenu. - You can now add all your future assignment pages into the sub-menu so that a viewer can easily navigate to them without cluttering up your Navigation Menu
Bonus
- If you finish earlier than your classmates, see if you can figure out how to add a header image of your website that is this image of the Denver skyline. Try googling to find instructions or tips!